Exchange Online External Email Tags
The External Email Tag in Microsoft 365 clearly marks emails from outside your organization, making them easier to spot. Instead of relying on the older methods — such as prepending “[External]” to the subject line or inserting a yellow warning banner into the message body — this feature adds a clear visual indicator directly next to the sender’s email address in Outlook.This subtle but powerful change ensures users can immediately see whether the message is from an internal or external source, both when receiving and replying to emails.
By integrating the warning into the sender identity itself, the indicator feels more natural, harder to overlook, and less disruptive to message readability.
Why External Email Tags?
- 🛡 Improved Security Awareness – Instantly highlights messages from outside your organization.
- ❌ Reduced Risk of Human Error – Prevents staff from mistaking external messages for trusted internal communication.
- 🎯 Cleaner User Experience – No subject line clutter or disruptive banners in message bodies.
- 🚀 Future-Proof Alignment – Microsoft’s recommended modern approach, supported across Outlook clients and mobile apps.
This control not only reduces phishing risk but also supports compliance with security frameworks such as ISO 27001 and NIST by strengthening user awareness.
The benefits are significant.
Comparison with Older Methods
Method
Pros
Cons
External Email Tag (New)
Integrated next to sender, modern, hard to miss, clean design
Requires newer Outlook clients
Subject Prefix ([External])
Works everywhere, simple to set up
Clutters subject lines, easy to spoof, breaks threading
Yellow Banner in Body
Visible in most clients, straightforward
Can be ignored, adds noise, not linked to sender identity
See samples from Outlook Desktop:
Figure 1: Incoming email with External tag.
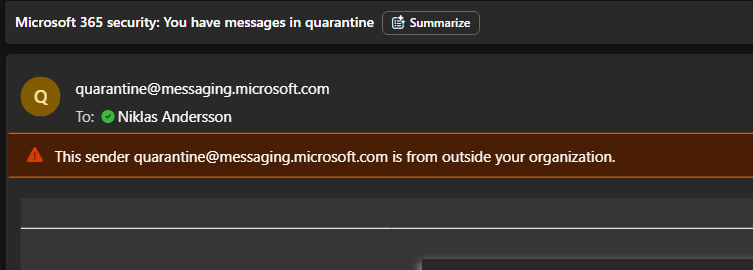
Warning and color mark the email as external, there is also action the recipient could take if needed direct.
Figure 2: Actions for Incoming email with External tag.
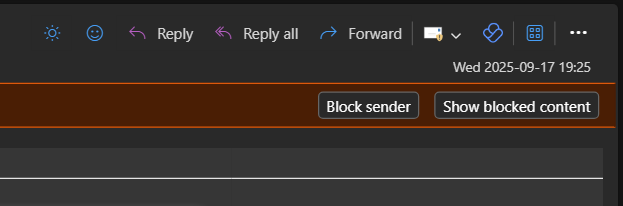
Figure 3: If domain missing Email Security Frameworks (SPF,DKIM/DMARC), verification can't be done (Trash folder).

Figure 4: Outgoing email with External tag.
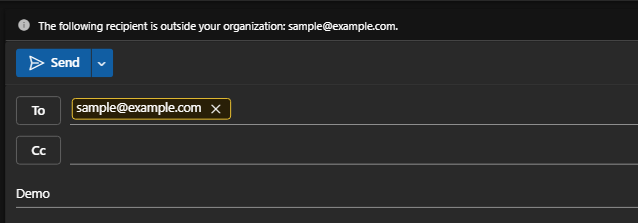
The yellow frame appears as soon as email address has been written or added.
View Script
The External Email Tag in Microsoft 365 clearly marks emails from outside your organization, making them easier to spot. Instead of relying on the older methods — such as prepending “[External]” to the subject line or inserting a yellow warning banner into the message body — this feature adds a clear visual indicator directly next to the sender’s email address in Outlook.This subtle but powerful change ensures users can immediately see whether the message is from an internal or external source, both when receiving and replying to emails.
By integrating the warning into the sender identity itself, the indicator feels more natural, harder to overlook, and less disruptive to message readability.
Why External Email Tags?
- 🛡 Improved Security Awareness – Instantly highlights messages from outside your organization.
- ❌ Reduced Risk of Human Error – Prevents staff from mistaking external messages for trusted internal communication.
- 🎯 Cleaner User Experience – No subject line clutter or disruptive banners in message bodies.
- 🚀 Future-Proof Alignment – Microsoft’s recommended modern approach, supported across Outlook clients and mobile apps.
This control not only reduces phishing risk but also supports compliance with security frameworks such as ISO 27001 and NIST by strengthening user awareness.
The benefits are significant.
Comparison with Older Methods
| Method | Pros | Cons |
|---|---|---|
| External Email Tag (New) | Integrated next to sender, modern, hard to miss, clean design | Requires newer Outlook clients |
| Subject Prefix ([External]) | Works everywhere, simple to set up | Clutters subject lines, easy to spoof, breaks threading |
| Yellow Banner in Body | Visible in most clients, straightforward | Can be ignored, adds noise, not linked to sender identity |
See samples from Outlook Desktop:
Figure 1: Incoming email with External tag.
Warning and color mark the email as external, there is also action the recipient could take if needed direct.
Figure 2: Actions for Incoming email with External tag.
Figure 3: If domain missing Email Security Frameworks (SPF,DKIM/DMARC), verification can't be done (Trash folder).
Figure 4: Outgoing email with External tag.
The yellow frame appears as soon as email address has been written or added.
View Script